Documentation
Main rollup

Preset
Choose a preset. A text description of each preset is displayed below.
S S R R2
The three small buttons ´S´ ´S´ and ´R´ can be used to ´S´ave a custom preset, to ´S´ave default values of RichDirt, in case you prefer different default values. The ´R´ button can be used to Reset the default values. Note: RichDirt Extreme users can have a description how to change/configure -each- of the presets individually via ini-files (1 ini file for every preset).
Clean
Add here a color or a texture map. Typically this would be the texture/color that you use for the diffuse slot of your material. The clean color is used when no obstacles/occlusion is found.
Dirt
Add here a color or a texture map. This is used where RichDirt finds an obstacle/occlusion.
Ambient Occlusion
Enables classical ambient occlusion.
Inner Occlusion
Enables inner occlusion (IO). What is the benefit of Inner Occlusion ? Inner occlusion allows to tint the edges of any object (AO would only generate contact shadows).
 |
 |
 |
| Neutral Image (no AO, no IO) |
AO Only | IO Only |
Samples
Samples controls the number of samples to calculate the dirt effect. Samples = 1 gives a coarse and grainy image. Values between 4 and 10 often give a good look. Larger values give a smoother image.
Renderers today have different sampling of the framebuffer. Some of these samplers shoot more rays adaptively, so if RichDirt is noisy the renderer adds more sample automatically. Sometimes this works very well, you then only need 1 sample in RichDirt. Sometimes this works less well. Experiment with your preferred sampler on a simple model. Try 1,4,16,64 in RichDirt and watch quality + time. Dependencies : Rendering Times can increase with more samples.
V-Ray: V-Ray Adaptive DMC is different from V-Ray Adaptive Subdivision Sampling. Use 64 samples for Adaptive DMC. Use less samples (below 64) for V-Ray Adaptive Subdivision .
V-Ray 3.6: this removed Adaptive DMC, samplers are "Progressive", "Bucket","Bucket Advanced" and "Bucket Expert" now. For "Progressive" and "Bucket" (simple) you dont need to set the samples in RichDirt any longer. Rendering times and quality is nearly constant for 1,4,16,64 samples in RichDirt (V-Ray censors big values and adds more samples automatically for small values).
mental ray 3ds Max 2018: For sampling mode "Unified/Raytraced" one can try to use less than 64 samples. The "unified" mode prefers to oversample textures itself. In theory 1 sample should suffice, but tests show that 4 samples are the absolut minimum required to get a good final still image. You can try values like 20,30,40 here as the impact on rendering time is linear. You will get less noise with 40 compared to 20. If you do not use motion blur "classic/raytraced" can be the better choice, overall rendering times are better for the same image quality. "unified" is better for motion blur and depth-of-field. If using these, first do test renderings without RichDirt - so you get your desired level of noise/grain in the image. Later add RichDirt samples slowly, starting with 4 can be a good choice. The most extreme example is a fast moving object that is out-of-field. This does not require smooth RichDirt samples. For "classic/raytraced" use higher values such as 64 samples in RichDirt. For "classic/raytraced" RichDirt samples come on top of mental ray ´Samples per Pixel` that can be set in the Renderer Sampling Quality tab. Optimal Workflow: Do final quality test with your preferred ´Samples per Pixel´ and then adjust the RichDirt Samples to get the amount of grain you desire.
 |
 |
 |
| Samples = 1 | Samples = 8 | Samples = 32 |
Spread
Spread is in degrees from 0 to 90. 90 degrees cover a full hemisphere. 90 degrees give the typical ambient occlusion effect. Small values (below 20 degrees) typically make only sense when also using a ´bias´ to orient the cone upwards or downwards (see below) or ´follow up slope´ (see below). Dependencies : Spread also determines how streaks are looked up. Small spread = sharp streaks. Wide spread (> 20 degree) = blurred streaks. Dependencies II : RichDirt supports negative values (-30 degree to -1 degree). This creates a flat cone. Flat spread distributions provide Rich flexibility and effects that cannot be achieved by other solutions - make sure to read the full flat cone description later.
 |
 |
 |
| Spread = 90 degree | Spread = 40 degree | Spread = 10 degree |
Radius
Radius determines how ´far´ the effect reaches. This can be a few cm/inches to highlight edges. A good values is multiple feet/0.5 meters to highlight the outline of a building. Larger values like 10 feet/ 2 meters can be useful for rain simulations. Important: Radius uses units (cm, mm, meter, inches, feet). Dependencies : When changing 3ds Max® System Unit Scale the radius is updated as well, in general avoid modifying 3ds Max® System Unit System on an existing model . Note: the image below uses objects with a height of circa 2 meter / 6 feet.
 |
 |
 |
| Radius = 10 cm | Radius = 50 cm | Radius = 100 cm |
Falloff
Falloff determines how the result ´decays´ when going away from a hit. Falloff 1.0 is linear. Falloff values below 1.0 fade the result -soon-. Values closer to 10, like 2.0 or 5.0 fade the result -late-. Small values seem to make the ´radius´ shorter, while larger values keep a strong intensity for a longer radius/distance. Large values can be used to get a sharp (coarse) edge.
 |
 |
 |
| Falloff = 0.2 | Falloff = 1.0 (linear) | Falloff = 10 |
Bias
Bias X,Y,Z is a bias of the normal. The range is from -50.0 to + 50.0. Bias can be used to change the direction of the cone, like pointing downwards for splashes or pointing upwards for rain. Bias X and Y work as left right bias. All of the bias values are in worldspace. They can also be used to simulate wind influence on a facade, like a systematic shift of results to one side. Large values like 20 or 50 dominate over the original normal. For values below 1.0 the original normal remains more important. Dependencies : Avoid strong bias values for displacement. Avoid negative spreads (below 0.0 degree) combined with strong bias.
 |
 |
 |
| Bias Z = -1.0 (up) | Bias Z = -50.0 (strong up) | Bias Z = -1.4, Y = 1 |
Optimize Thin
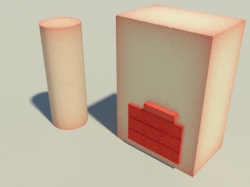
Optimize Thin is one of the most compelling features of RichDirt. It is extremly useful as it dramatically enhances the look of thin objects or surfaces like tiles on a wall. The example image below uses ´standard´ size tiles. Without ´Optimize Thin´ the tiles are very intense, and there is no gradient inside tiles. ´Optimize Thin´ also works very well for the main walls of a building, such as a real wall thickness versus a real building size.
 |
 |
| Optimize Thin off | Optimize Thin on |

Thinner cubes get dark without optimize thin. Adding optimize thin gets good results with nice edges
Ignore Bump
Bump maps influence the normal, and thus the direction of RichDirt effects. This is often desirable. Sometimes bump maps can be too intense, which looks like holes cut into the effect. Switch on Ignore Bump for such cases. As a matter of fact realworld flow of water/dirt on a facade often runs ´over´ obstacles, ignoring bump is then very useful. Ignore Bump works for both bias and slope, it is also interesting when using unbiased AO/IO with small spread (like a few degrees). Small spreads as well as negative spreads are sensitive to bump.
 |
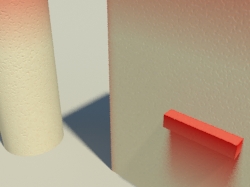 |
| Ignore Bump= Off | Ignore Bump= On |
Merge Objects R2

Merge Objects is another of the most compelling features of RichDirt.
Attention: Merge Objects requires RichDirt Extreme. It is not used in RichDirt Standard.
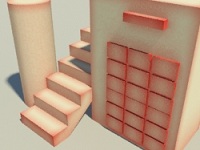
When rendering buildings, you often have real models which use ceilings that extend to the walls (see the yellow geometry in the image above).
Doing ´inner occlusion´ then triggers an edge/streaks.
You don´t want this! In RichDirt1 (as well as any other solution)
you had to change the model to get a good rendering.
RichDirt2 has solved this - the new ´merge objects´ feature renders like the objects
had indeed been merged (the interior split magically disappears).
This feature is exclusively available with RichDirt2 - see the example in the image above !
Rotate with Object Space R2
This is a special feature for star ship designers. Unlike buildings star ships fly, including moves and rotations. The builtin streaks are in worldspace and would not work then. ´Rotate with Object Space´ supports standard moves and rotations (no deformations, no explosions). When weathering a star ship special care is needed for instanced parts; because the object space of instanced geometry is identical, the streaks would look identical too. A solution is to export the model and reimport so instances are merged into one big mesh. Also note that you need to use short radii for an animation, for example when landing a star ship on the runway occlusion rays ´see´ the runway and then add more dirt. Ideally render in seperate passes and composite later.
Horizontal
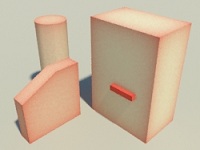
Horizontal is an option to increase the weight of horizontal surfaces. In the real world horizontal surfaces look different than other surfaces, for example (rain) water would remain on a flat surface and slowly dry up. Resulting dirt looks different on such surfaces. Horizontal makes dirt on horizontal surfaces stronger or less intense. Horizontal works as a multiplier. Values below 1.0 always work, down to 0.2. Values above 1.0 (up to 5.0) can give a stronger result IF there are more obstacles found nearby. Dependencies : Horizontal actually needs to find/hit something, it is NOT a simple weight for horizontal surfaces. It works best with smaller bias, and bigger spread - small spreads typically dont hit much, strong bias typically directs most rays into one direction and so there are less hits. Images below use a spread of 90 degrees and neutral bias.
 |
 |
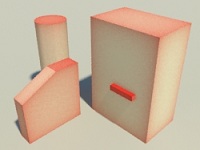 |
| Horizontal = 0.4 | Horizontal = 1.0 (default) | Horizontal = 3.0 |
Upper Edge
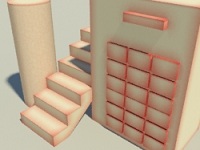
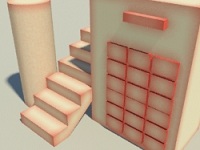
Upper Edge is an option to increase intensity when approaching an (upper) edge (when the edge is found in upwards direction). For example dirt on a a wall tile can be more intense in its upper part. Upper Edge works as a multiplier (weight). Values below 1.0 work easily , down to 0.2. Values above 1.0 (up to 5.0) can give a stronger result IF there are indeed edges nearby. Typically, values above 1.0 have a subtle effect. It is often easier to combine an Upper Edge of 0.2 with a Lower Edge of 5.0 to get a stronger effect.
 |
 |
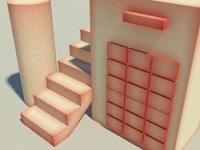 |
| Upper Edge = 0.2 | Upper Edge = 1.0 (neutral) | Upper Edge = 5.0 |
Lower Edge
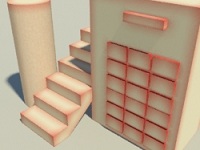
Lower Edge is an option to increase intensity when getting closer to a lower edge (when the obstacle is found in downwards direction). Dirt on a wall tile, for example, can be more intense in its lower part. Lower Edge works as a multiplier (weight). Values below 1.0 always work, down to 0.2. Values above 1.0 (up to 5.0) can give a stronger result -if- there are indeed edges nearby. Typically values above 1.0 have a subtler effect. It is often easier to combine a Lower Edge of 0.2 with an Upper Edge of 5.0 to get a stronger effect.
 |
 |
 |
| Lower Edge = 0.2 | Lower Edge = 1.0 (neutral) | Lower Edge = 5.0 |
Slope
The direction of the cone follows the up slope of surfaces. This is very useful when surfaces have different orientation. A single RichDirt texture can be used for objects with different orientation - a Rich improvement in workflow. Follow Up Slope is very interesting to simulate effects of water flowing down a facade, especially when combined with Streaks (see below). It is great to support roofs - any surface that is neither vertical nor horizontal. Dependencies : Follow Up Slope ignores Bias values (the slope overrides the bias). Follow Up Slope does not work on curved surfaces, except for vertical curvature. See Curvature for details. The images below use a spread of 15 degrees, to make it easier to see the cone direction. The first image uses a bias Z = -50.0 to turn the cone upwards. This works nicely for vertical surfaces, but it does NOT for the surface on the left side. This surface has a slope. When switching on ´Follow Up Slope´, the surface has a nice tint, the cone follows its slope. In RichDirt2 one can also use down slope to invert the direction.
 |
 |
| Use Bias (no slope) | Follow Up Slope |
Deg Up
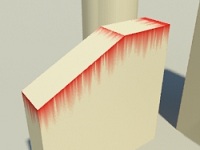
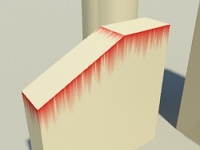
´Deg up´ stops water/streaks from flowing down a slope below a certain angle. Angle is measured against horizontal surface (= 0 degree). ´Deg Up´ is used for surfaces that point upwards. The images below use ´Streaks´ and a spread of 7 degrees (see below how to activate Streaks). Without ´Deg Up´ there are streaks at 2 places in the upper part of the object. With 6 degrees the first part is switched off - the surface here is nearly horizontal (below 6 degrees). With 20 degrees the second part is switched off as well. ´Deg Up´ is great to control where streaks start. It works without streaks as well.
 |
 |
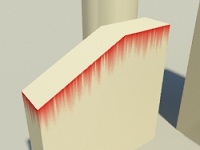 |
| Deg Up = 0 degree (= off) | Deg Up = 6 degree | Deg Up = 20 degree |
Deg Down
´Deg Down´ stops water/streaks from flowing down a slope below a certain angle. This is like Deg Up . However it works for ´hanging´ surfaces, like the lower side of a bridge. Often such objects show water/streaks effects. ´Deg Down´ allows to control this. The same RichDirt texture can be used for multiple objects.
mental images and mental ray, are registered trademarks, and are trademarks of NVidia, in the U.S.A. and/or other countries. V-Ray and the V-Ray logo are registered trademarks of Chaos Software Ltd. in Bulgaria and/or other countries. Autodesk and 3ds Max are registered trademarks or trademarks of Autodesk, Inc., and/or its subsidiaries and/or affiliates in the USA and/or other countries. finalRender is a registered trademark of cebas Computer in Germany. All other brand names, product names, or trademarks belong to their respective holders.
enRichPro Copyright © All Rights Reserved