Note: this page describes a product that is not available for purchase after December 26th 2024.
You probably wanted a top notch rendering many times
but have you ever seriously dared to do this in top quality ?
And why did you never do that ?
Most likely because it took you too much time to add all the extra details !!
Read more !
- How you add streaks to concrete, tiles and stucco!
- How you weather a huge street block quickly!
- How you add splashes to a front easily!
- How you add natural variations across a whole building!
- What are the 2 must have features of RichDirt ?
What do you do -today- when texturing non-rectangular objects?
How do you match the corner points ?
Do you stretch at the price of distortions ?
What do you do when the texture has an orientation (like streaks)? - cut the streaks in Photoshop®,
turn them manually, and re-add them - to match the edge?
How do you get the correct orientation on surfaces with an up slope?
With RichDirt you get streaks at the edge, even when objects have a different shape. The orientation is correct - automatically.
Optimize thin - the must have number 1
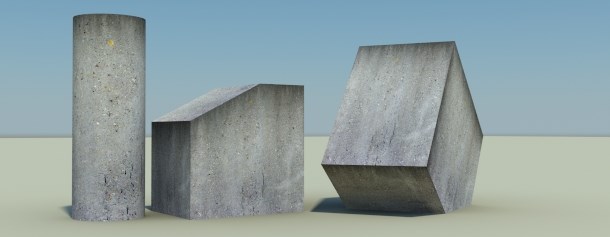
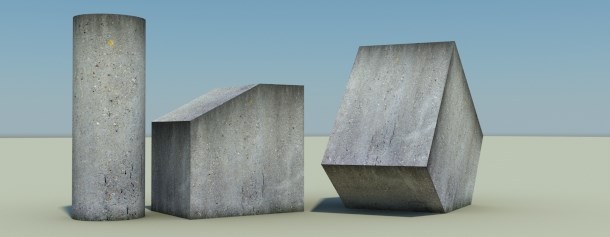
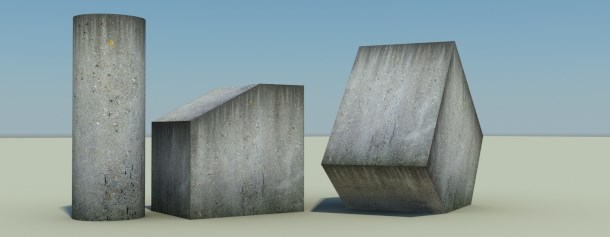
When doing occlusion on walls, tables, doors - any thin object - occlusion would darken the whole object. The following image shows this - the cuboids get thinner and darker.

The ´optimize thin´ algorithm solves this. The before/after images below show you how well it works and the text below explains why this is so important to get things done fast. The first image is rendered without the ´optimize thin´ feature of RichDirt. The second image uses ´optimize thin´. First take a look, which one do you like more? Read more below (there is a real risk that you stop reading here, because you would miss a really important point). Move the circle !!
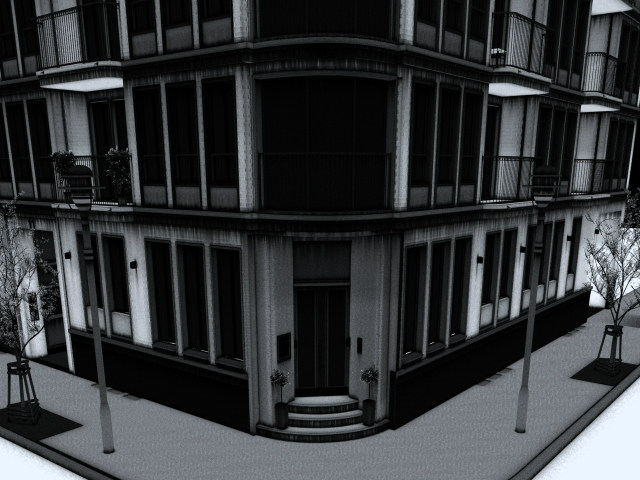
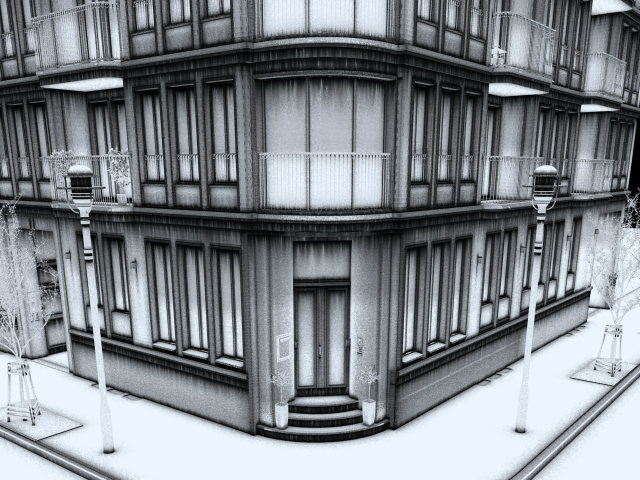
Do you prefer the ´right´ image ? Both images use the very same materials, textures, lights, geometry. 100 % identical. The model itself is a real production model made by Pixelsonic. The model´s geometry has -not- been touched for use with RichDirt. Furthermore, none of the materials was touched. All rendering was done via a single Render Element that uses RichDirt. The original geometry includes objects that are very thin:
- All windows are thin
- The door is thin
- The wall touching the ground is thin
- The doorbell plate is thin
- The ledge is thin
Without RichDirt the best image you could get is the first of the 2. To get the better image one needs RichDirt - it is the only dirt solution that has the ´Optimize Thin´ algorithm builtin. It even works on the curved part of the ledges ! Why does this create such a big benefit in time (work) ? You don´t have to modify geometry. You don´t have to create local materials (like an extra material for the ledges using a smaller radius to make it look good).
Breakthrough style
Use breakthrough to add more/less break through areas. This is very easy to control, simply set the percentage of gaps/fills. Get the best results with a few breakthroughs, or a lot, the images below use 9% and 92%. Imagine this on a facade.


Wash style
Use wash to intensify the wash effect. Combine this with wash length to determine how far the water reaches. The images below use 35% and 44%.


Sill Edges
Do your most realistic building ever - add sill edges at the edge of window benches. This new RichDirt feature uses even the wind direction, so you get stronger sill edge streaks on the east versus the west side. RichDirt is the worldwide exclusive plugin to support sill edges procedurally !

Better Streets
After releasing RichDirt1 several studios asked for stronger dirt on streets and with doors/kitchen. Classical ambient occlusion fails here, the dirt stops too early. RichDirt2 is your solution for better streets, more realistic pavements. Flat obstacles (street/curb stone) cast a much better (wider) contact shadow now. The new algorithm also works when your uphill streets have a coarse triangulation. The same algorithm can be used to age wooden doors or a vintage designer kitchen.


The image above shows a street done with classical ambient occlusion. The contact shadow is very short and there is no way to make it larger (a larger radius still does not find the curb stone). RichDirt´s optimized flat cone does a much wider contact shadow - which can be used to make a darker area or add some sand here.
How to weather a whole street block in 1 minute ?

In the past the whole weathering process had been manual, and expensive. So it was exclusively used for film productions. RichDirt itself is a big step forward - but a street block with all details still needs a lot of work with the mouse - to update materials. This is solved with RichScene. RichScene handles all the assignments automatically for you.
Using RichDirt2 and RichScene you add weathering in as fast as 1 minute for 7 buildings,
including 4 layers of streaks, splashes and more for every building.
Why is this so much faster ?
1. RichScene handles a full scene, adds dirt maps to all materials.
2. RichScene adds to the ´current selection´, for example the front of a a building.
3. RichScene can change colors and styles in several layers on the full scene.
4. RichDirt PRESETS deliver out-of-the-box effects.
5. RichDirt doesn´t require uvs, save time to tune uvs around windows, doors and benches.
What exactly is the difference between RichDirt and RichScene?
RichScene is a second plugin. RichDirt is a ´map´ plugin in 3dsMax terms. RichScene is a manager plugin - it has been created to make your workflow faster. It adds dirt maps to all materials in your scene, changes colors and styles easily. Never before had it been easier to create variety and realism !

RichDirt Extreme
Back to RichDirt ...
Richdirt comes as Standard and Extreme version. RichDirt Extreme adds a bundle of extra features to get even more variations and realism. Ideal for larger projects, optimal when realistic dirt is your goal and time doesn´t allow for manual painting of details.
Merge Objects - the must have feature number 2

When rendering buildings you often have real models, that use ceilings that extend to the walls. Doing ´inner occlusion´ then triggers an edge/streaks. You don´t want this ! In RichDirt Version 1 (as well as any other solution) you had to change the model to get a good rendering. RichDirt Version 2 has solved this - the new ´merge objects´ feature renders like the objects had indeed been merged (the interior split magically disappears).
Dry area detection (RichDirt Extreme)
Dry areas don´t get rain drops, hence less streaks - for example below a balcony. RichDirt automatically detects these areas for you.


RichDirt Extreme adds more variations using 3 groups of parameters
- Per object id: Change falloff, breakthrough , wash effect when touching a different object id.
- Per wind (height): Add more breakthrough in the upper part of a building.
- Per world: Add more details in worldspace to get a richer image for wide/full shots.
Variety Per Object ID (RichDirt Extreme)
Each window bench has a different id. This is used to change the dirt in a unique way. Some benches get more falloff, some a wider radius, some more breakthroughs.


Variety Per World Space (RichDirt Extreme)
Here the ´breakthrough´ changes from 10%,20%,30% to 50%. Done in worldspace it creates bundles of streaks. This is excellent for realism of wide/full shots, to get a good visual variety.
Variety Per Wind (Height) (RichDirt Extreme)
In nature wind is stronger for higher parts of a building, more rain and longer sill edges are typical. RichDirt Extreme supports this via a builtin height function. It is easy to use and adds another level of realism to your renderings. The image below shows more breakthroughs on the upper part. The sill edge length is bigger, as there is more rain.


It is great to see this new innovative plug-in from a valued long term partner.
The many presets make working with it a snap for beginners. Will certainly be including this in my workflows from now on!
I´m really excited about it !
It is set to become one of my favorites which I use in my everday work flow.
I will not hesitate to add it to our architectural pipeline."
I tried it on a shot i am finaling right now ... one click to get a nice grunge/ambient occlusion map"
However, it was time consuming. Even though we use VRay at our studio, I now save a substantial amount of time in post production, especially when there's a tight deadline.
Opposed to traditional texture painting, we were able to create highly detailed wear-maps inside of 3dsMax. Since they are based on logical, almost physical principals they look perfect and very realistic. It's indeed very clever!"
I worried my MD by showing him the muck it can produce, he was worried I was going to start making all the new building projects we do into grungy images. But it will be used gently - to great effect when modelling existing buildings, next to our new ones. The old ones can be made more dirty. I like the way I can export many layers of grime, and use them how I want in Photoshop or After Effects.
mental images and mental ray, are registered trademarks, and are trademarks of NVIDIA, in the U.S.A. and/or other countries. Autodesk and 3ds Max are registered trademarks or trademarks of Autodesk, Inc., and/or its subsidiaries and/or affiliates in the USA and/or other countries. Adobe and Photoshop and After Effects are either registered trademarks or trademarks of Adobe Systems Incorporated in the United States and/or other countries. All other brand names, product names, or trademarks belong to their respective holders.
enRichPro Copyright © All Rights Reserved

