Documentation
Tutorials
Compositing RichDirt with Photoshop + V-Ray
This tutorial shows how to use RenderElements created by RichDirt in Photoshop. It shows the basics of compositing with Photoshop and V-Ray.

The tutorial shows how to solve 4 major hurdles in the workflow, 1 in V-Ray, 1 in 3ds Max and 2 in Photoshop.
What is the basic idea of compositing dirt ?
You split a rendering in several elements and then re-add these elements in Photoshop. The advantage is that you can easily control color and intensity of layers. Adding images in Photoshop is real time, you don´t need to re-render for 1 hour to get a change in your images. This can be up to 1000 times faster than simple re-rendering ! And it offers much more artistic freedom.
The tutorial is organized in 2 sections:
- An Introduction to Compositing / Render Elements. No Dirt is used here. This is very useful if you haven´t done any kind of compositing before. (Experienced users simply read this section faster) The first section runs from number 1 to 5
- Adding dirt - how to do this most efficiently ! This section runs from number 6 to 14
- Create a new output image, name this 'All Together' This will be used to add all layers.
- Set the Color 'mode' to 32 bit. 16 bit would cause trouble via color cutting.
- Add the gi image ('normal' mode)
- Add the di image ('add' mode) - note that 'add' is called 'Linear Dodge (add)' in the English version of Photoshop. Non-English Photoshop sometimes use weird translations for 'add'. Now we have all of the illumination
- Add the diffuse image ('multiply' mode) Now we have the image reconstructed. Background (sky) and glossy reflections are missing.
- Add background ( 'add' mode )
- Add reflections ( 'add' mode ). The reflections render element contains the glossy and mirror reflections.
- Select the 3 cubes in the viewport
- Press the right mouse button. This shows a pop-up dialog. Select the 'Object Properties'
- Now the Object Properties dialog is open. Enter an Object-Id to the 'G-Buffer'. You find this near the lower right corner of the dialog. Choose an object id of 65535. For 65535 V-Ray will render white pixels in the RE.
- Add the ´Rich Building´ RE to it (´normal´ mode)
- Add the ´Splashes´ RE to it (´multiply´ mode)
- Add the ´Rich Building + Streaks´ RE (´multiply´ mode)
- Load the Object ID Render Element
-
Convert it to 16 bit (Photoshop does not allow ´invert´ on 32 bit images)
main menu -> Image -> Mode -> 16bits /channel -
Invert the image
main menu -> Image -> Adjustments -> Invert , or simply press ´Control-I´. - You have indeed antialiasing on in the renderer. High quality is required here.
- You use 32 bit. Aliasing shows more with 16 bit.
- For the background (sky) there can be a gap, at pixels that are half background and half object. Using ´lighter color´ instead of ´add´ can improve this.
- Add a gauss filter with size 0.5 px to the inverted object id mask. This reduces most of the aliasing directly.
- A brute force approach to solve aliasing, if you have enough processor power, is to render in larger resolution. Do the high res compositing in Photoshop and then reduce the image size.
- Duplicate the Dirt Effects group. (To duplicate select the group layer, and press right mouse, then choose ´duplicate layer´). We need to duplicate it to avoid loosing it in the next step. Name this new group ´green dirt´.
- Now convert this to a ´smart object´
- Once it is a smart object Photoshop allows to apply ´Rasterize Layer´. We need this (group -> smart object - > rasterize layer) because Photoshop doesn´t allow changing colors on a group of 32 bit elements.
- Now select the layer, and convert it to 16 bit. (Photoshop does not allow color changes on 32 bit). Main menu -> Image -> Mode -> 16 bits / channel
- Now change the color to a greenish tone Main menu -> Image -> Adjustments -> Hue/Saturation. Choose a green color here. Switch on the ´Colorize´ toggle in the Hue/saturation dialog, so the green is visible.
Introduction to Compositing with V-Ray, 3ds Max Render Elements and Photoshop
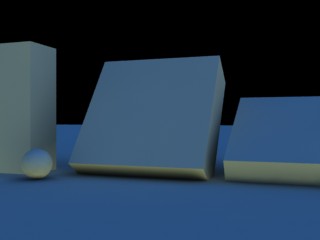
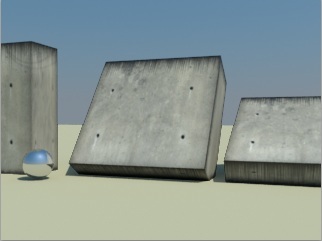
An image of our example scene - without dirt : It uses 3 concrete cubes on a floor. The size of the cubes is around 200 cm (80 inch). There is 1 mirror sphere, to cover reflections. The background uses a procedural sky.

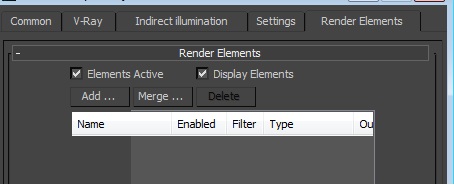
1) Where do I find the Render Elements (RE) ?
They are found in the rendering dialog, in the ´render elements´ tab. Non-English versions of 3ds Max might have different translations, but the position of the tab is the same.
We want to separate lighting (illumination) from textures.
This means we need Global Illumination (gi) also known as ´Indirect Illumination´ - without- textures.
We also need Direct Illumination -without- textures.
Then we also need the textures without any illumination.
Why separating illumination from textures ?
We want to change the diffuse texture later !
2) Add the following Render Elements
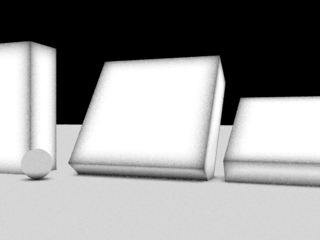
Diffuse - VrayDiffuseFilter

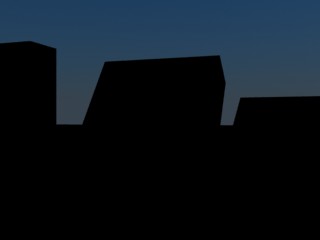
Direct light - VRayRawLighting

Indirect illumination - VRayRawGlobalIllumination
Background (sky) - VRayBackground
Reflections - VRayReflection

3) Possible mistakes part I
For Indirect illumination use VRayRawGlobalIllumination. Do -not- confuse this with VRayGlobalIllumination. For VRayReflection do -not- use the raw reflection (VRayRawReflection), it would be to strong.
4) Possible mistakes part II
You need to export images using gamma 1.0.
You need to store global illumination (gi) and direct illumination (di) as -exr-,
with 32 bit per rgb. 16 bit and 8 bit would cut colors.
Using jpg (8 bit) will give a wrong result in Photoshop when adding gi to di.
(When adding gi + di Photoshop clips values above 1.0 (white) so a part of the illumination is dropped).
When exporting .exr from 3ds Max, choose 16 bit (half float). Photoshop can handle this and shows it as
32 bit. If you export .exr as 32 bit on the Max side Photoshop pretends to be able to handle it, but it shows a broken image
instead.
The 5 Render Elements :

5) Start Photoshop
Result - we get the exact same image as inside 3ds Max. So the compositing worked ! If you get a different image, check again that you exported the images from 3ds Max using a gamma of 1.0 and used 32 bit in Photoshop. Note: the tutorial was done with a NFR version of V-Ray, which adds a watermark.

Now let us start with the second section of this tutorial - how to add dirt:
6) Go back to 3ds Max, add 3 VRayExtraTex Render Elements
a) Create the first VRayExtraTex RenderElement
b) Add a RichDirt texture to it.

Drag the texture into the material editor to edit it.
Use the 'Rich Building preset'.
If this is too fast (not enough details in the tutorial - see the video tutorial how to
create a single dirt Render Element. The video has more details.
c) Create a second and third VRayExtraTex RenderElement
d) Add RichDirt with preset 'Splashes (variations)' and 'Building edge streaks'.
Render - you now should get the following 3 images:


7) Create a VRayObjectId Render Element.
Why to use the Object ID ? Use this to split your scene into objects that get dirt, and objects that should not get dirt. Assign an object id to the objects that you want to be dirty.
The Render Element would render black on black if you do not assign object ids, by default 3ds Max doesn´t add ids.
To assign object ids:
What is the ObjectId Render element good for ? It will be used as a -mask- in Photoshop. This is very attractive and fast when you have a larger scene, like 1000 cubes, and you want dirt only added to 227 cubes. Object-ids can be assigned to all selected objects, so you can use max groups, layers, and more to quickly select objects, and then add 1 id to all of them.
8) Switch back to Photoshop
This creates combined dirt. RichDirt uses black and white colors by default so multiplying layers is easy.
Let us have a quick look at the delicious dirt:

9) How to get rid of the ground plane / how to add a mask in Photoshop ?
Dirt is added to -all- the geometry, including the ground plane. (Note that one can use RichDirt also as a texture, then each material can have different dirt. Per-material-textures can also write to a RenderElement, see the Reuse/Store tab of RichDirt´) When we later mix this with the diffuse texture we do -not- want dirt on the ground plane. So we need to mask it.
In your renderings you might not have a ground plane. So why is this covered so much in this tutorial ? The ground plane is an example for all geometry that you want to keep free from dirt. When you have a large model 1000s of objects might need dirt and other 1000s of objects do not want dirt. The approach described here solves this for you.
Photoshop masks typically are created manually, by hand painting / deleting areas with a brush, or with the lasso tool. For RichDirt we do -not- want any hand painting, we want a faster solution. Photoshop does -not- allow to directly specify a black-and-white image as a mask. Instead the following steps are required:
Now you have an image that can be used similar to a mask..
10) Copy the inverted object id (control-a + control-c)
a) Paste it into ´All together´ on -top- of the 3 dirt layers.
b) Set the mode to ´Lighter Color´.
Why ´Lighter color´ ? The inverted mask is white for all objects that should not get dirt.
By using lighter color white will win over the medium gray
ground plane, as white is ´lighter´ than gray.
11) Now select the 3 dirt layers + the object id mask, press ´Control-G´ to create a group.
Name this group ´Dirt Effects´. The object id mask must be inside the group, so it is only applied
to the dirt.
The huge advantage of using a group is that we can control weights (opacity) of
streaks, splashes to get exactly the amount of dirt we want in our scene.
This is essential to get the big speed-up compared to re-rendering.
12) Congratulations ! You have a full setup now.
The fun part is to adjust the weights (opacity) of streaks, splashes to get the exact amount of
dirt you like.
To make sure you see the full setup here is a snapshot of the layers in Photoshop.
Check this when you think you missed a step somewhere in the tutorial.
Also check if your layers are still in 32 bit. When converting a single layer to 16 bit
Photoshop sometimes converts all layers to 16 bit.

13) Aliasing
Compositing in Photoshop is very fast, so why doesn´t everybody use it -all- the time ? At edges of objects (masks) one can easily get aliasing. To minimize this assure
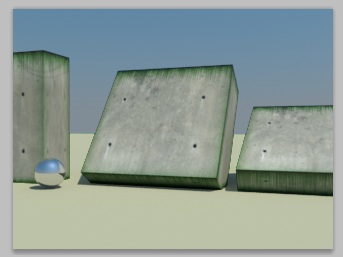
14) Creating colored dirt
The compositing set up above uses multiplication, which makes things -darker-. This is often perfect. But sometimes you want dirt that has a different color, like greenish moot, or brown rust. To achieve this do the following steps in Photoshop
The dirt group with a green tint

Moot on concrete
mental images and mental ray, are registered trademarks, and are trademarks of mental images GmbH, in the U.S.A. and/or other countries. V-Ray and the V-Ray logo are registered trademarks of Chaos Software Ltd. in Bulgaria and/or other countries. Autodesk and 3ds Max are registered trademarks or trademarks of Autodesk, Inc., and/or its subsidiaries and/or affiliates in the USA and/or other countries. finalRender is a registered trademark of cebas Computer in Germany.Adobe and Photoshop are either registered trademarks or trademarks of Adobe Systems Incorporated in the United States and/or other countries . All other brand names, product names, or trademarks belong to their respective holders.
enRichPro Copyright © All Rights Reserved